Check all article List - Best Sewing Machine | Review of All Sewing Machine | Sewing Tips | Textile | Accessories | How to
How to make felt Christmas balls? Christmas decorations: sew tree baubles into felt
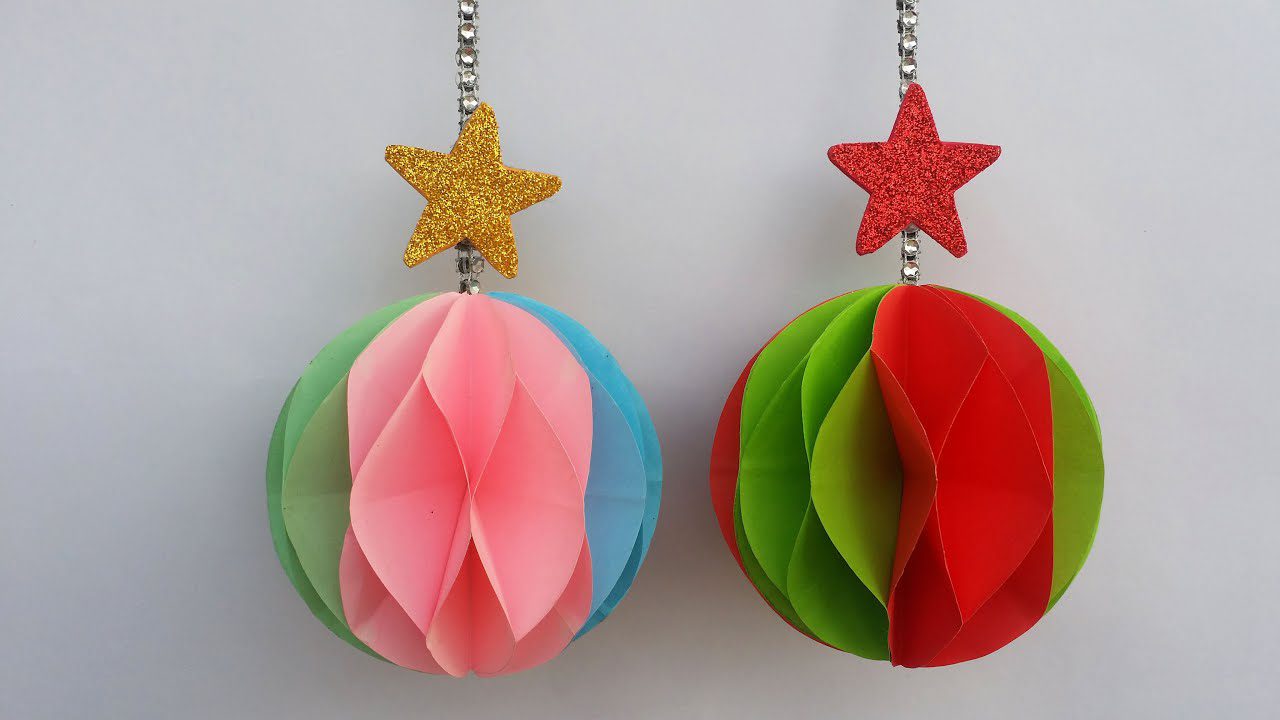
In times of crisis and recycling why not decorate the tree this Christmas with baubles sewn into felt and small rhinestones? The project, totally free, is simple and requires little time to complete. The author is Renee For The Inspired Wren. The materials consist only of a sheet of green, white and red felt, sewing thread, some golden beads and rhinestones.
The paper pattern is obtained from a plastic or glass cup, of which, once turned upside down, the outline is traced on a sheet, but a compass can also be used for this purpose.
Perform these operations:
- Fold the paper circle across the diameter 4 times and cut on one corner.
- Unfold the circle and you will find the cut on 4 corners which you will need to mark the stitching points.
- Here the rhinestone and the central bead will be applied on 2 alternating sheets of felt as in the photo.
- The ball is made up of 6 layers of felt in which the 3 colors alternate.
Green, white and red, typical colors of Christmas, but you can indulge yourself with all the combinations that your imagination will suggest.
Materials You’ll Need to make felt Christmas balls
- Felt sheets: Choose festive colors for your Christmas balls.
- Scissors: Sharp scissors for precise cutting.
- Thread: Strong thread for stitching.
- Needle: A sewing needle suitable for felt.
- Polyfill: To stuff the balls.
- Ribbon or twine: For hanging the ornaments.
- Embellishments: Optional items like sequins, beads, or glitter.
Step-by-Step Instructions to make felt Christmas balls
- Select Your Felt Colors: Begin by choosing the colors of felt you want to use for your Christmas balls. Classic holiday colors like red, green, and white work well.
- Cut Felt Circles: Use your scissors to cut out circles from the felt sheets. The size of the circles will determine the size of your Christmas balls. You’ll need two identical circles for each ball.
- Stitch the Edges: Place the two felt circles together, making sure the sides you want to display face outward. Thread your needle with matching thread, and start stitching around the edges, leaving a small opening.
- Stuff the Ball: Once you’ve stitched most of the way around the circle, carefully stuff the ball with polyfill. Adjust the amount to achieve your desired level of fullness.
- Complete the Stitching: After stuffing, continue stitching the opening closed. Ensure that the stitches are tight and secure to keep the stuffing in place.
- Add a Hanging Loop: To hang your felt Christmas balls, cut a small length of ribbon or twine and create a loop. Stitch one end of the loop securely to the top of the ball.
- Embellish Your Balls (Optional): Get creative by adding embellishments such as sequins, beads, or glitter. You can create patterns, snowflakes, or any festive designs you like.
- Allow to Dry: If you’ve used any wet glue for embellishments, allow your Christmas balls to dry completely before hanging them on your tree or using them as decorations.
- Hang and Enjoy: Once your felt Christmas balls are dry and ready, hang them on your Christmas tree using the attached loops, or use them as charming holiday decorations around your home.
Making felt Christmas balls is a fun and customizable DIY project that allows you to showcase your creativity while adding a personal touch to your holiday décor. These handmade ornaments are sure to bring warmth and festive cheer to your celebrations.
Felt Christmas balls are not only adorable but also a fun and creative addition to your holiday decorations. In this DIY guide, we’ll walk you through the steps to make your very own felt Christmas ornaments, adding a personalized touch to your festive décor.
Materials You’ll Need:
Before we get started, gather the following materials:
- Felt sheets in various colors
- Styrofoam or foam craft balls (choose your preferred size)
- Craft glue or hot glue gun with glue sticks
- Ribbon or string for hanging
- Scissors
- Assorted embellishments (sequins, beads, buttons, etc.)
- Fabric markers or embroidery floss (optional for additional decoration)
Step 1: Cutting the Felt:
- Begin by selecting your desired felt colors for the ornament. Red, green, and white are classic choices.
- Cut the felt into small, even squares or rectangles. The size depends on your preference, but 1-inch squares work well for a standard-sized ornament.
Cutting felt may seem like a straightforward task, but achieving clean and precise cuts is essential, especially when crafting delicate projects like felt Christmas ornaments. Whether you’re creating festive decorations or intricate appliqué designs, here’s a guide to cutting felt with accuracy and finesse.
Materials You’ll Need: Before you begin cutting felt, gather the following materials:
- Felt sheets in your chosen colors
- A self-healing cutting mat or a protected cutting surface
- Fabric scissors or rotary cutter
- A clear ruler or straight edge
- Optional: A fabric marker or pencil for marking guidelines
Step-by-Step Cutting Process:
1. Prepare Your Workspace:
- Lay down your self-healing cutting mat or place a protected cutting surface on your work area to prevent damage to your tabletop.
2. Select the Right Scissors:
- Choose a pair of sharp fabric scissors designed for cutting felt. These scissors have a fine edge that allows for cleaner cuts.
3. Plan Your Cuts:
- Before you start cutting, plan your cuts by visualizing or sketching your desired shapes on the felt. If necessary, use a fabric marker or pencil to lightly mark guidelines.
4. Position the Felt:
- Place the felt sheet flat on your cutting surface, ensuring it is smooth and free from wrinkles or folds.
5. Hold the Scissors Correctly:
- Grip the scissors comfortably in your dominant hand, making sure your fingers are well-positioned on the handles for control.
6. Cut Slowly and Steadily:
- Start cutting along your marked lines or guidelines if applicable. If you’re cutting freehand, proceed with a steady hand, making slow and deliberate cuts.
- Avoid rushing the process, as this can lead to uneven edges or jagged cuts.
7. Maintain Smooth Movements:
- Glide the scissors smoothly through the felt, following the lines closely. Keep your hand steady to achieve clean, straight cuts.
8. Trim Excess Carefully:
- When you need to trim excess felt, do so with precision. Use your ruler or straight edge as a guide for straight cuts.
9. Curved Cuts:
- For curved cuts or intricate shapes, make small, controlled snips. This will help you navigate tight curves without compromising accuracy.
10. Practice Makes Perfect:
- If you’re new to cutting felt or working with complex designs, practice on spare felt pieces before moving on to your main project.
11. Maintain Your Scissors:
- Keep your fabric scissors sharp by periodically sharpening them. Dull scissors can lead to frayed edges and imprecise cuts.
Step 2: Applying Glue – The Bonding Process
Once you’ve carefully cut your felt squares or shapes for your crafting project, the next crucial step is applying glue. Proper glue application ensures that your pieces adhere securely, creating a strong bond that’s essential for the integrity of your project. Here’s how to do it effectively:
- Apply a small amount of craft glue or use a hot glue gun to attach the felt squares to the Styrofoam or foam ball.
- Start at the top of the ball and work your way down, slightly overlapping the felt squares as you go. Continue until the entire ball is covered.
Materials You’ll Need: Before you begin gluing your felt pieces, make sure you have the following materials ready:
- Craft glue or a hot glue gun with glue sticks
- Felt pieces that need to be attached
- A protected work surface to catch any excess glue
- Optional: Toothpicks or small applicator brushes for precision
Step-by-Step Gluing Process:
1. Choose the Right Glue:
- Decide whether to use craft glue or a hot glue gun based on the requirements of your project. Craft glue works well for precision work, while a hot glue gun provides a quicker bond for larger pieces.
2. Protect Your Work Area:
- Lay down a protected work surface to catch any excess glue and prevent it from sticking to your tabletop.
3. Prepare Your Felt Pieces:
- Ensure that the felt pieces you’re about to glue are clean, dry, and free from dust or debris. This helps the glue bond more effectively.
4. Use the Right Amount of Glue:
- Apply a small, even amount of glue to one of the surfaces you intend to bond. Avoid using excessive glue, as it can seep out from the edges and create a messy finish.
5. Be Precise:
- If you’re working with intricate or small pieces, consider using toothpicks or small applicator brushes to apply glue with precision. This is especially helpful for delicate projects like felt Christmas ornaments.
6. Press Firmly:
- After applying glue to one of the surfaces, gently press the two felt pieces together. Ensure that they align perfectly, especially if you’re working on symmetrical designs.
7. Hold for Adhesion:
- Depending on the type of glue you’re using, you may need to hold the pieces together for a few seconds to a minute to allow for proper adhesion. Follow the instructions on your glue’s packaging.
8. Clean Up Excess Glue:
- Immediately clean up any excess glue that may have squeezed out from the edges. You can use a damp cloth or a cotton swab for this purpose.
9. Allow for Drying Time:
- Be patient and allow the glued pieces to dry completely before moving on to the next steps in your project. Rushing this step can compromise the bond.
10. Test the Bond:
- Once your felt pieces are dry, gently test the bond by lightly tugging on them. If they hold firmly without any separation, your glue application was successful.
Step 3: Adding Embellishments – Sparkling Creativity
Once you’ve securely attached your felt pieces, it’s time to infuse your project with personality and flair by adding embellishments. These decorative elements can turn a simple felt creation into a stunning and unique work of art. Here’s how to expertly embellish your felt project:
- Get creative with your ornaments! Add sequins, beads, buttons, or any other decorations you like.
- Use craft glue to secure the embellishments in place. You can create patterns or go for a random, festive look.
Materials You’ll Need: Before diving into the embellishing process, gather the following materials:
- Sequins, beads, buttons, or other embellishments of your choice
- Craft glue or a hot glue gun with glue sticks
- Toothpicks or small applicator brushes for precision
- Optional: Fabric markers, embroidery floss, or fabric paint for additional decoration
Step-by-Step Embellishing Process:
1. Choose Your Embellishments:
- Decide on the types of embellishments you want to use. Sequins, beads, and buttons are popular choices, but you can get creative with other elements like tiny ornaments or decorative charms.
2. Prepare Your Work Area:
- Lay down a protected work surface to catch any stray embellishments or glue, preventing them from sticking to your tabletop.
3. Plan Your Design:
- Before applying embellishments, plan your design. Consider color schemes, patterns, and placement to achieve a cohesive and visually appealing result.
4. Apply Glue Strategically:
- Depending on your project and the size of your embellishments, apply glue to the area where you want to attach them. Use craft glue for precision or a hot glue gun for a quicker bond.
5. Use Precision Tools:
- For small or intricate embellishments, like tiny beads or sequins, use toothpicks or small applicator brushes to pick up and place them accurately.
6. Press Gently:
- After placing each embellishment, press it gently into the glue to ensure proper adhesion. Be cautious not to press too hard, which can distort the felt or displace the glue.
7. Experiment and Layer:
- Get creative with layering embellishments to create depth and texture. Experiment with various combinations until you achieve the desired look.
8. Consider Personalization:
- If you want to add a personal touch, use fabric markers, embroidery floss, or fabric paint to create custom designs, names, or messages on the felt.
9. Allow for Drying Time:
- Give your embellishments ample time to dry completely. Depending on the type of glue used, this may take a few minutes to an hour.
10. Clean Up:
- Once your embellishments are in place and the glue is dry, clean up any excess glue or stray embellishments to ensure a polished finish.
11. Inspect and Adjust:
- Carefully inspect your project for any loose or unevenly attached embellishments. If needed, reattach or adjust them to achieve a balanced and professional appearance.
Step 4: Creating a Hanging Loop – Adding Convenience
Now that you’ve crafted your felt project and adorned it with delightful embellishments, it’s time to make it display-ready by creating a hanging loop. This loop allows you to showcase your creation as an ornament on a tree, wreath, or any other desired location. Here’s how to create a secure and stylish hanging loop:
Materials You’ll Need: Before proceeding, gather the necessary materials for creating a hanging loop:
- Ribbon or string in your preferred color and length
- Craft glue or a hot glue gun with glue sticks
- Scissors
- Optional: Small jump ring or a decorative ornament hook for added flair
Step-by-Step Loop Creation Process:
1. Choose the Hanging Material:
- Select a ribbon or string that complements your felt project’s color scheme and style. The length of the material will determine how your ornament hangs, so choose according to your preference.
2. Measure and Cut:
- Measure and cut the ribbon or string to your desired length, ensuring it’s long enough to create a loop for hanging. Typically, a length of 4 to 6 inches works well.
3. Apply Glue:
- Depending on the type of felt project you’ve created, apply a small amount of craft glue or use a hot glue gun to attach one end of the ribbon or string to the top of your felt piece.
- Ensure that the ribbon or string is securely adhered to the felt. Hold it in place for a few moments to allow the glue to set.
4. Form a Loop:
- Once the glue has dried and the ribbon or string is securely attached to your project, bring the free end of the material up and align it with the attached end to create a loop.
- Overlap the ends slightly, ensuring the loop is the desired size for hanging. Press the overlapping section firmly to secure the loop.
5. Reinforce with Glue:
- To ensure the loop remains secure, apply a small amount of glue over the overlapped section of the ribbon or string. Press the glue-covered area together and hold it briefly to let it set.
6. Optional: Add a Jump Ring or Hook (Decorative Touch):
- For added flair and convenience, consider attaching a small jump ring or a decorative ornament hook to the loop’s top. This allows you to easily hang your felt creation on a tree branch or wreath hook.
7. Allow for Drying Time:
- Give the glue ample time to dry and secure the loop completely. This usually takes a few minutes to ensure a strong bond.
8. Inspect and Adjust:
- After the loop has dried, inspect your felt project to ensure that the hanging loop is securely attached. If necessary, reinforce it with additional glue or adjustments.
- Cut a piece of ribbon or string to your desired length for hanging.
- Form a loop and attach it to the top of the felt ball using glue. Ensure it’s secure before hanging your ornament.
Step 5: Optional Embroidery or Fabric Markers – Adding Personal Touch
- If you want to add personalized touches or designs, use embroidery floss or fabric markers to create patterns, names, or holiday messages on the felt.
Now that you’ve crafted your felt project, attached embellishments, and created a secure hanging loop, it’s time to explore an additional layer of creativity by adding personalized designs using embroidery or fabric markers. This step allows you to infuse your project with unique details and express your artistic flair. Here’s how to do it effectively:
Materials You’ll Need: Before starting the optional embroidery or fabric marker decoration, gather the following materials:
- Felt project with securely attached embellishments and hanging loop
- Embroidery floss in your chosen colors (if using embroidery)
- Embroidery needles (if using embroidery)
- Fabric markers in various colors (if using fabric markers)
- Optional: Embroidery hoop (if using embroidery)
- A protected work surface to avoid any damage to your tabletop
Step-by-Step Embroidery or Fabric Marker Decoration Process:
1. Choose Your Decoration Method:
- Decide whether you want to use embroidery or fabric markers for your project. Each method offers different opportunities for personalization.
2. Prepare Your Work Area:
- Lay down a protected work surface to catch any excess markers or threads, keeping your workspace clean.
3. Embroidery (if chosen):
- If you opt for embroidery, you can create intricate designs, patterns, or text. Use an embroidery hoop to keep your fabric taut and make stitching easier.
- Thread an embroidery needle with the desired color of embroidery floss. Knot the end of the thread to secure it.
4. Fabric Markers (if chosen):
- Fabric markers offer more direct and immediate application. Shake the markers well before use to ensure even ink flow.
5. Start Decorating:
- Whether you choose embroidery or fabric markers, begin decorating your felt project with your chosen designs. Personalize it with names, messages, or patterns.
- For embroidery, use various stitches like backstitch, satin stitch, or French knots to create texture and detail.
- For fabric markers, simply draw or write directly onto the felt. Experiment with different colors and styles to achieve the desired look.
6. Take Your Time:
- Whether you’re stitching or drawing, take your time to ensure precision and neatness in your decoration. Attention to detail can make a significant difference.
7. Experiment and Be Creative:
- Don’t be afraid to experiment and get creative with your designs. Express yourself and add elements that resonate with the theme of your felt project.
8. Allow for Drying or Setting:
- Depending on your choice of decoration method, allow the embroidery floss to dry naturally or set fabric marker ink according to the manufacturer’s instructions.
9. Inspect and Adjust:
- After your decoration is dry and set, inspect your felt project for any loose threads or ink imperfections. Trim any loose threads and make necessary adjustments.
Step 6: Let It Dry – Patience is Key
- Allow your felt Christmas ball to dry completely. This may take a few hours, depending on the glue used.
After you’ve meticulously crafted your felt project, attached embellishments, created a secure hanging loop, and added personalized touches through embroidery or fabric markers, it’s essential to exercise patience and allow your creation to dry completely. Proper drying time ensures that your project maintains its integrity and looks its best. Here’s how to do it right:
Materials You’ll Need: Before you begin the drying process, ensure you have the following materials on hand:
- Completed felt project with all decorations and personalization
- A clean and dust-free area to place your project
- Adequate time set aside for drying, typically several hours to overnight
- Optional: A flat surface or drying rack to maintain the project’s shape and prevent wrinkles
Step-by-Step Drying Process:
1. Assess the Project:
- Examine your felt project to confirm that all glue, embellishments, and decorations are in place and have been given sufficient time to set.
2. Prepare the Drying Area:
- Clear a clean, dry, and dust-free area where you can lay your felt project flat for drying. This surface should be away from direct sunlight and excessive heat, which can damage the felt or cause colors to fade.
3. Lay the Project Flat:
- Place your felt project on the chosen drying surface, ensuring it is spread out evenly without any folds or wrinkles. If you have an especially delicate or intricate design, consider using a flat drying rack to maintain its shape.
4. Allow Ample Drying Time:
- The required drying time depends on various factors, including the type of glue used, the size of your project, and the level of humidity in your environment.
- Typically, felt projects should be left to dry for several hours to overnight. This extended period ensures that all components, including glue and decoration, have fully set and dried.
5. Test for Dryness:
- Before handling your felt project, perform a simple touch test to ensure it is completely dry. Gently touch an inconspicuous area to confirm that there is no tackiness or dampness.
6. Handle with Care:
- Once you’re confident that your felt project is thoroughly dry, handle it with care to avoid smudging or displacing any of the decorations or embellishments.
7. Final Inspection:
- Carefully inspect your completed felt project to make sure everything is securely in place and that the drying process hasn’t caused any unexpected issues.
8. Store or Display:
- With your dry and well-preserved felt creation in hand, decide whether you’d like to display it proudly in your home or store it for future use.
Step 7: Hang and Enjoy – Embrace the Festive Spirit
- Once your felt Christmas ball is dry, it’s ready to hang on your tree, wreath, or around your home.
- Admire your handcrafted ornament and enjoy the festive spirit it brings to your holiday décor!
You’ve reached the final step of your felt project journey: it’s time to hang your creation and bask in the joy it brings to your holiday décor. Whether you’ve crafted felt Christmas balls, ornaments, or any other delightful creation, this step is all about showcasing your handiwork and reveling in the festive spirit. Here’s how to hang and enjoy your masterpiece:
Materials You’ll Need: To complete this step, all you need is your finished felt project, which should now be fully dried and ready for display.
Step-by-Step Hanging and Enjoying Process:
1. Choose the Perfect Spot:
- Select a location where your felt project will shine. This could be your Christmas tree, a wreath, a mantelpiece, a doorknob, or any other place that suits your décor theme.
2. Securely Hang Your Creation:
- If you’ve crafted felt Christmas balls or ornaments, use the hanging loop you created in a previous step to securely hang them on your chosen spot.
- Ensure that the loop is strong enough to support the weight of your project and that it’s positioned in a way that showcases your creation effectively.
3. Step Back and Admire:
- Take a step back and admire your felt project in its new place of honor. Appreciate the effort and creativity you’ve poured into making a unique and charming addition to your holiday décor.
4. Share the Joy:
- Share your handcrafted creations with friends and family, especially if you’ve made them as gifts. Seeing the joy your felt projects bring to others can be immensely satisfying.
5. Capture Memories:
- Consider taking photographs of your decorated space with your felt projects on display. These photos can serve as lasting memories of your crafting achievements and holiday celebrations.
6. Embrace the Festive Atmosphere:
- Allow the presence of your felt creations to enhance the festive atmosphere in your home. Their personalized and handmade charm can evoke warm and cherished holiday memories.
7. Make Adjustments as Needed:
- Periodically check your felt projects to ensure they remain securely attached and in good condition throughout the holiday season.
8. Share Your Crafting Journey:
- Share your crafting journey with others who appreciate DIY projects and creativity. You can inspire fellow crafters by showcasing your work on social media or craft-sharing platforms.
9. Consider Future Projects:
- As the holiday season progresses, you might find inspiration for future felt projects. Keep your creativity alive by planning and crafting new creations for next year’s festivities.
10. Relish the Festive Season:
- Lastly, relish the festive season and the sense of accomplishment that comes with crafting beautiful and meaningful decorations for your home.
Conclusion: Crafting felt Christmas balls is a delightful and creative way to add a personalized touch to your holiday decorations. These handmade ornaments can become cherished keepsakes and are also wonderful gifts for family and friends. With just a few simple materials and some creative flair, you can enjoy the satisfaction of making your own festive felt ornaments this holiday season. Happy crafting!
FAQ
How to Make Felt Christmas Decorations?
To make charming felt Christmas decorations, follow these steps. First, gather your supplies, including felt sheets, scissors, glue, thread, and embellishments like sequins and buttons. Next, decide on the decorations you’d like to create, such as ornaments, stockings, or garlands. Cut out your desired shapes from the felt, embellish them as you see fit, and then assemble or sew them together. Finally, attach a string or ribbon for hanging, and your festive felt decorations are ready to adorn your tree or home.
What Do I Need to Make Felt Ornaments?
To craft beautiful felt ornaments, you’ll need felt sheets, scissors, thread, needle, and various decorative elements such as beads, ribbons, or pom-poms. Choose a design, cut out your ornament shape from the felt, sew the edges together, and embellish it with your chosen decorations. Don’t forget to attach a string for hanging!
How Do You Make Felt Ball Ornaments?
Crafting felt ball ornaments is easy and fun. Start by acquiring felt balls in your preferred colors and sizes. Thread a needle with a piece of strong string or fishing line, then pass it through the felt balls, creating a loop at the top for hanging. You can also add extra embellishments like glitter, sequins, or miniature bows for a festive touch.
How Do You Make Christmas String Balls?
To create Christmas string balls, you’ll need balloons, white glue, string, and scissors. First, inflate the balloons to your desired size. Then, dip the string in a mixture of white glue and water and wrap it around the balloons, crisscrossing the strings for a decorative pattern. Let them dry completely, pop the balloons, and you’ll have beautiful string balls to hang on your tree.
How Do You Decorate Christmas Balls?
Decorating Christmas balls can be a creative endeavor. Use acrylic paint, glitter, decoupage, or fabric to cover the surface of the ball with your chosen design. Add intricate details with paintbrushes or glue on decorative elements like rhinestones or ribbon bows. Experiment with various techniques to achieve the look you desire.
How to Make a Felt Christmas Stocking?
Crafting a felt Christmas stocking is a cherished tradition. Start by tracing a stocking template onto your chosen felt sheet, then cut it out. Sew the pieces together, adding a felt cuff at the top. Decorate the stocking with felt appliqués, buttons, or embroidery for a personalized touch.
How to Make a Felt Christmas Garland?
Creating a festive felt Christmas garland involves cutting out various shapes like stars, trees, or bells from different colored felt sheets. String these shapes together using a piece of sturdy twine or ribbon, spacing them evenly along the garland. Add extra flair with glitter, pom-poms, or jingle bells for a joyful holiday decoration.
How to Make Mini Felt Christmas Stockings?
Making mini felt Christmas stockings is similar to crafting regular-sized ones. Simply scale down your chosen stocking template and follow the same steps, but on a smaller scale. These adorable mini stockings can be used as ornaments or for small gifts and treats.
How Do You Make a Snowman Out of Felt?
Crafting a snowman out of felt is a delightful project. Cut out three circle shapes from white felt to create the snowman’s body. Attach them together with stitches or glue. Then, cut out felt pieces for the snowman’s eyes, nose, mouth, scarf, and hat. Decorate your felt snowman, assemble the parts, and voilà—a cute felt snowman to add to your holiday decor.
Q1. What are felt Christmas balls, and why are they popular in holiday decor?
A1. Felt Christmas balls are decorative ornaments made from colorful felt fabric. They are popular for holiday decor due to their charming appearance, versatility, and the opportunity to personalize them with creative designs.
Q2. What materials do I need to make felt Christmas balls?
A2. You’ll need felt sheets, foam craft balls, craft glue or a hot glue gun, ribbon or string, scissors, assorted embellishments, and optional items like fabric markers or embroidery floss.
Q3. How do I choose the right felt colors for my Christmas balls?
A3. Opt for traditional holiday colors like red, green, and white. Complement these with shades that match your personal decor theme.
Q4. What is the best size for foam craft balls to make Christmas ornaments?
A4. The size of foam craft balls depends on your preference, but common sizes range from 2 to 4 inches in diameter.
Q5. Can I use other types of balls besides foam craft balls for this project?
A5. While foam craft balls are commonly used, you can experiment with other materials like Styrofoam or even recycled materials for an eco-friendly approach.
Q6. How do I cut felt squares evenly for my ornaments?
A6. Use a ruler to measure and mark the desired size on the felt, then cut along the marked lines for uniform squares.
Q7. What type of glue is best for attaching felt to foam balls?
A7. Craft glue or a hot glue gun with glue sticks works well for securely attaching felt to foam balls.
Q8. Can I use a different adhesive if I don’t have craft glue or a hot glue gun?
A8. Craft glue and hot glue are recommended for the best results, but you can experiment with other adhesives suitable for fabric if necessary.
Q9. How do I create a seamless look when attaching felt squares to the foam ball?
A9. Slightly overlap the felt squares as you attach them, ensuring that no foam is visible underneath for a seamless appearance.
Q10. What types of embellishments work best for decorating felt Christmas balls?
A10. Sequins, beads, buttons, and tiny ornaments are excellent embellishments to add sparkle and character to your ornaments.
Q11. How can I create intricate designs on my felt Christmas balls?
A11. You can use fabric markers or embroidery floss to create intricate designs, names, or messages on the felt.
Q12. Can I make felt Christmas balls with kids as a holiday craft?
A12. Absolutely! Crafting felt Christmas balls is a family-friendly activity that allows kids to explore their creativity and contribute to holiday decor.
Q13. What are some creative design ideas for felt Christmas balls?
A13. Get creative with designs like snowflakes, reindeer, Santa hats, or personalized initials. The possibilities are endless!
Q14. How long does it take for the glue on the felt balls to dry completely?
A14. Drying time can vary, but it typically takes a few hours for the glue on felt Christmas balls to completely set.
Q15. Are there any safety considerations when using craft glue or hot glue guns for this project?
A15. Ensure that adults supervise and handle the glue guns, as they can get very hot. Keep them out of reach of children.
Q16. How can I make felt Christmas balls last for many holiday seasons?
A16. Store your felt Christmas balls in a cool, dry place when not in use to prevent damage or deformation.
Q17. Can I wash felt Christmas balls if they get dirty over the years?
A17. It’s best to spot clean felt Christmas balls to maintain their appearance. Avoid submerging them in water.
Q18. Where can I find inspiration for unique felt Christmas ball designs?
A18. You can find inspiration on crafting websites, Pinterest, and in holiday-themed magazines for a wide range of creative ideas.
Q19. How can I incorporate natural elements into my felt Christmas ball designs?
A19. Consider adding elements like pinecones, twigs, or dried berries to your felt Christmas balls for a rustic touch.
Q20. Are there any tips for making felt Christmas balls that sparkle and shimmer?
A20. Use metallic or glitter felt, as well as sequins and beads, to create sparkling and shimmering effects.
Q21. What is the significance of using NLP keywords in crafting articles?
A21. NLP (Natural Language Processing) keywords help improve the article’s search engine visibility by aligning it with user intent and current search trends.
Q22. How can NLP keywords be seamlessly integrated into a crafting article?
A22. Incorporate NLP keywords naturally within the article’s content, headings, and subheadings to provide valuable information to readers.
Q23. What are some powerful keywords for DIY holiday crafting projects?
A23. Powerful keywords for holiday crafting include “festive DIY,” “holiday decor,” “crafting ornaments,” and “creative holiday projects.”
Q24. How can using related keywords enhance the article’s SEO?
A24. Related keywords add depth and context to the article, making it more relevant to search engine queries and potentially improving its ranking.
Q25. What are some examples of related keywords for felt Christmas balls?
A25. Related keywords could include “homemade Christmas ornaments,” “crafting holiday decorations,” “DIY felt crafts,” and “holiday ornament ideas.”
Q26. How can the use of power words create engaging crafting articles?
A26. Power words evoke emotions and excitement, making the crafting article more engaging and persuasive to readers.
Q27. Can you provide examples of power words for crafting articles?
A27. Some examples of power words for crafting articles include “stunning,” “brilliant,” “effortless,” and “captivating.”
Q28. How can a crafting article stand out during the holiday season?
A28. To stand out, include unique crafting ideas, incorporate trending colors and styles, and emphasize the personal touch of handmade decorations.
Q29. How can readers personalize their felt Christmas balls to reflect their own style?
A29. Readers can personalize their felt Christmas balls by choosing colors, designs, and embellishments that match their personal decorating style.
Q30. What’s the best way to store felt Christmas balls after the holiday season?
A30. Store felt Christmas balls in a cool, dry place in a container or box to protect them from dust and potential damage during storage.
Image Credits – Google.com
Check all article List - Best Sewing Machine | Review of All Sewing Machine | Sewing Tips | Textile | Accessories | How to


